You’ll find guides and tips on how to get started and how to make your chatbot perform better.
Dialog Editor tools - the nodes.
Creating a good dialog is a fun challenge. You want to be sure that your end-users get the right answers and don’t waste their time by entering dead end branches or getting wrong answers.
Also avoid eternal loops, nobody likes to answer the same question over and over again with no way out. By limiting number of loops you’ll help the end-user continue with another alternative action.
Remember to test! With the Test dialog function in each Dialog, you can try all possible answers in a dialog to make sure it all works before you publish the dialog.
These are the tools in the floating menu to the left in the Dialog Editor, that you use to create all dialogs.
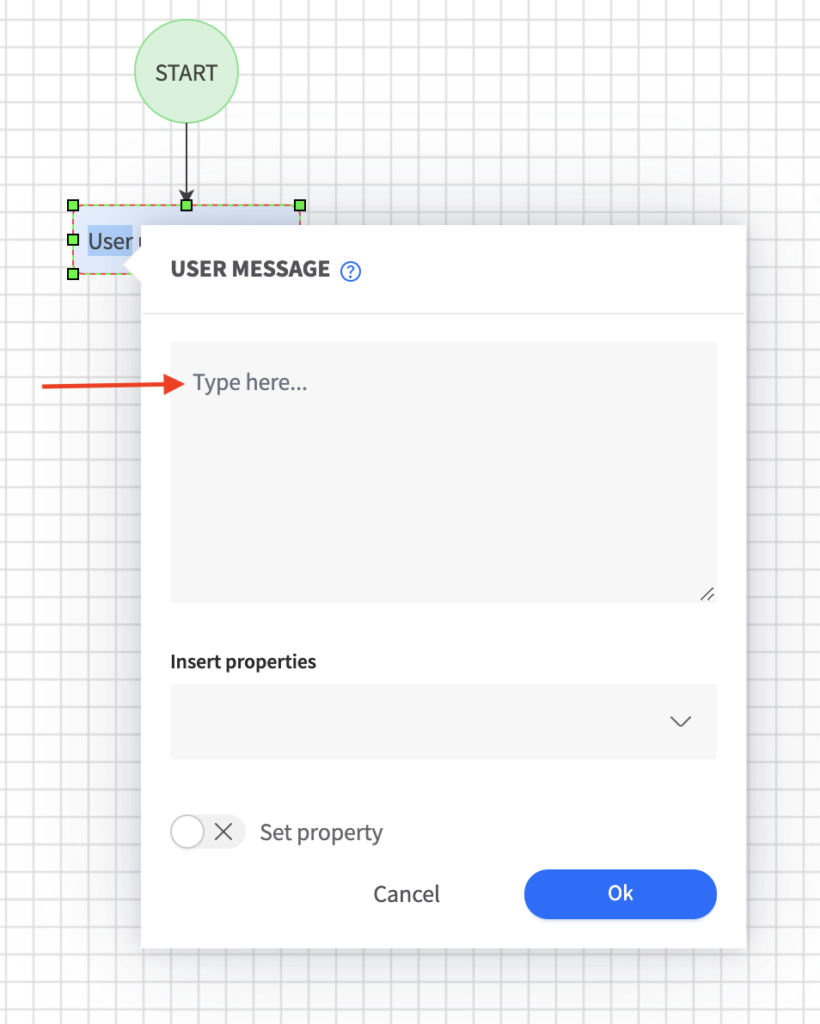
User message.
Message area
Type the answer that will be sent to the end-user.
More than one language.
If you have set this flow to present more than one language, go to top menu and select other DISPLAY LANGUAGE, and fill in a translation for every language you have chosen to present.
To display another language while filling in the next, you can select language in drop-down: See message in other language.
Warning - red frame
A User message node will have a red frame around until all necessary information is filled. The frame could stay red if there are obvious wrong details, or if you have set the dialog to contain more than one language, and a language version for that User messages is not yet provided.
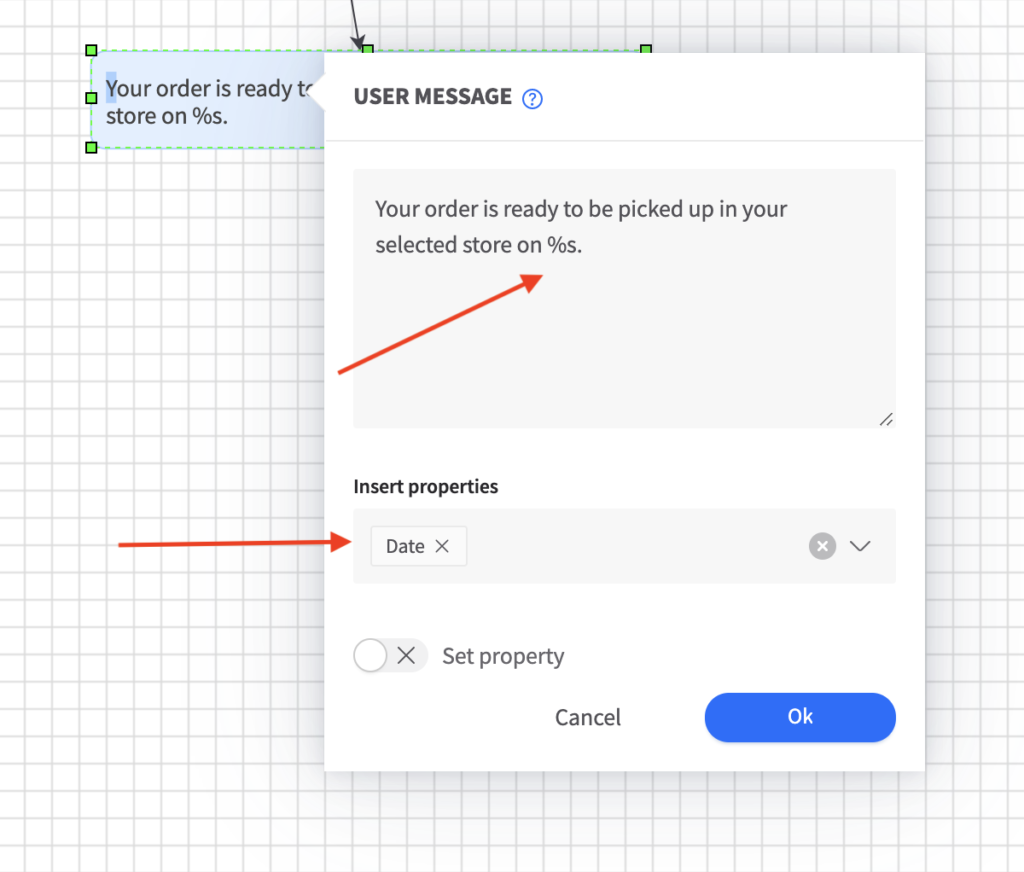
Insert properties
This parameter is to give information back to the end-user – that is already known or you have collected from the end-user earlier in the chat.
Properties can be a name, order id, email address, phone number etc.
To give the known information back to the user you insert the placeholder ”%s” in the message and choose the appropriate property from the dropdown menu.
If you insert more than one property, remember to list them in the order you want them displayed for the end-user.
Example: ”Your order is ready to be picked up in your selected store on %s.” As a property you choose to insert ”Date”.
Set properties
This parameter is to collect information from the user.
Already built-in properties are Date, Email, Text, True/False.
Custom properties for this particular node, choose “Text” and give the property a name, like “Val av tjänst”.
For Yes/No questions, choose True/False, and give it a display name.
When a value for the property is known
Never ask – if the property is set, the step will be skipped completely.
Ask to confirm – if the property is set, the step will be rendered but the set value will be given as an advance.
Always ask – acts as if the property is not set whether it is or not.
Alternatives
To present options as buttons for user, type the alternatives here and separate them with return. Follow up with a Decision node.
Decision.
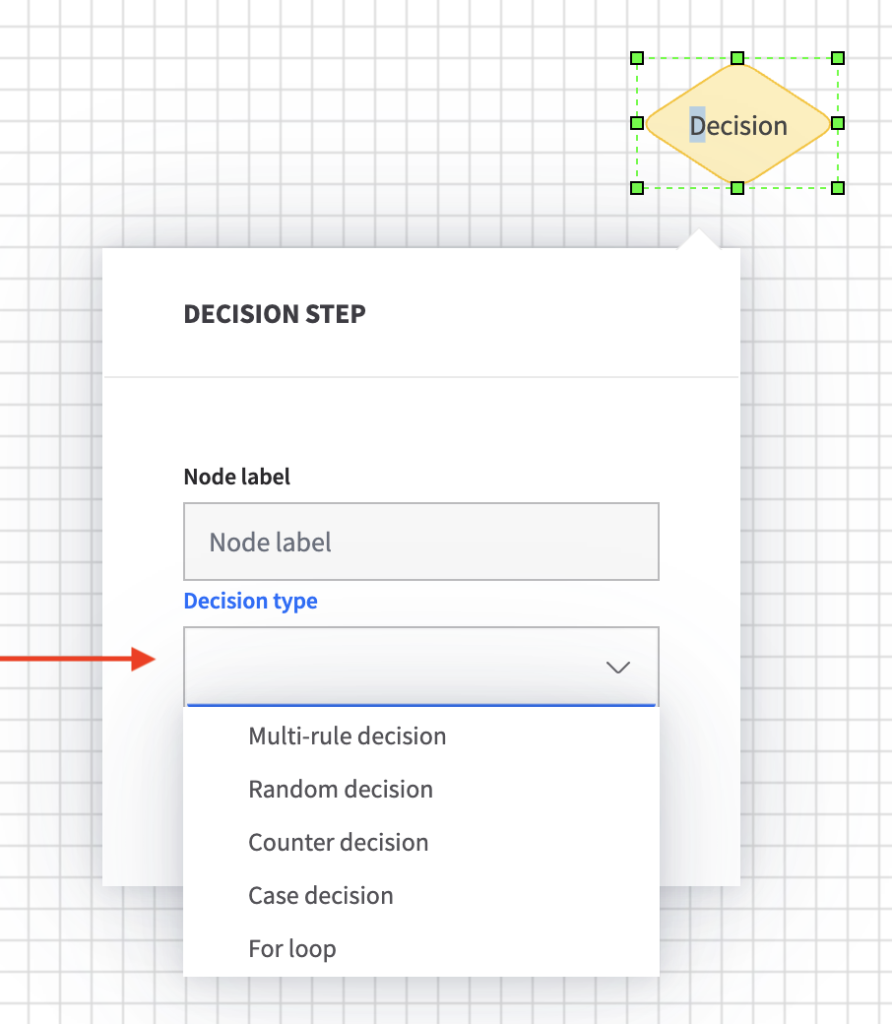
Decision type
Start with choosing type of decision that suits:
Multi-rule decision: For simple to complicated conditional decisions.
Random decision: When you would like messages to be shown randomly for the user.
Counter decision: When you want the user’s path to change after a number of times, if caught in a loop.
Case decision: For simple decisions.
For loop decision: Advanced option. To be used with External call node, when a delivery has several packages for instance. Use with List of properties.
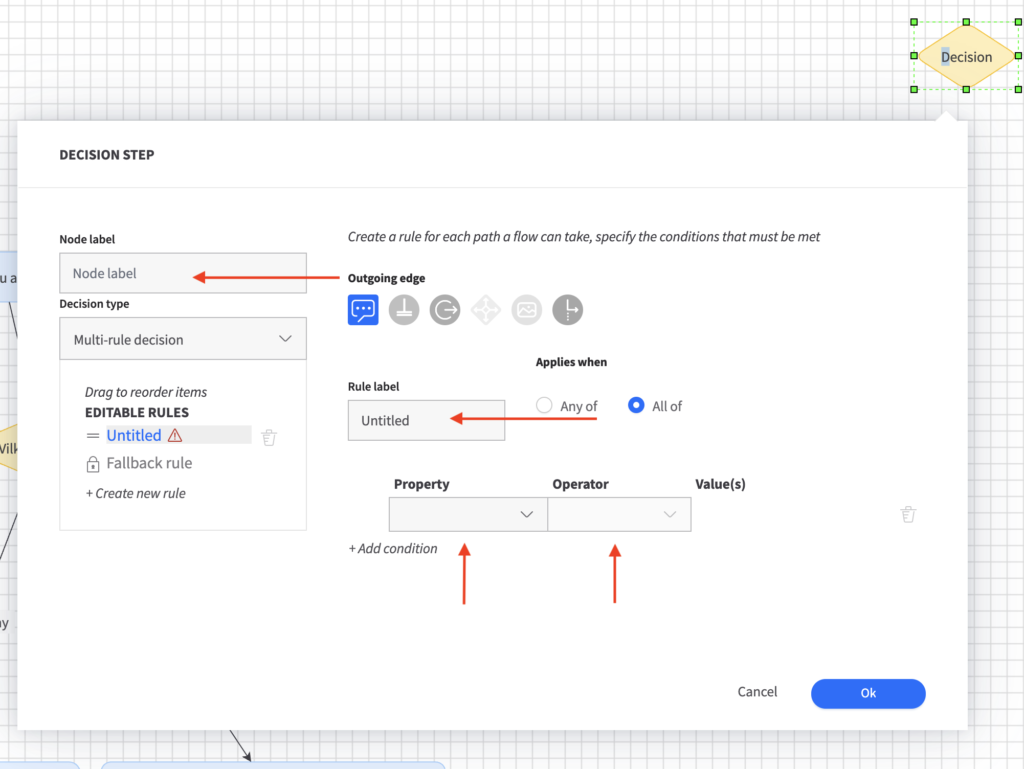
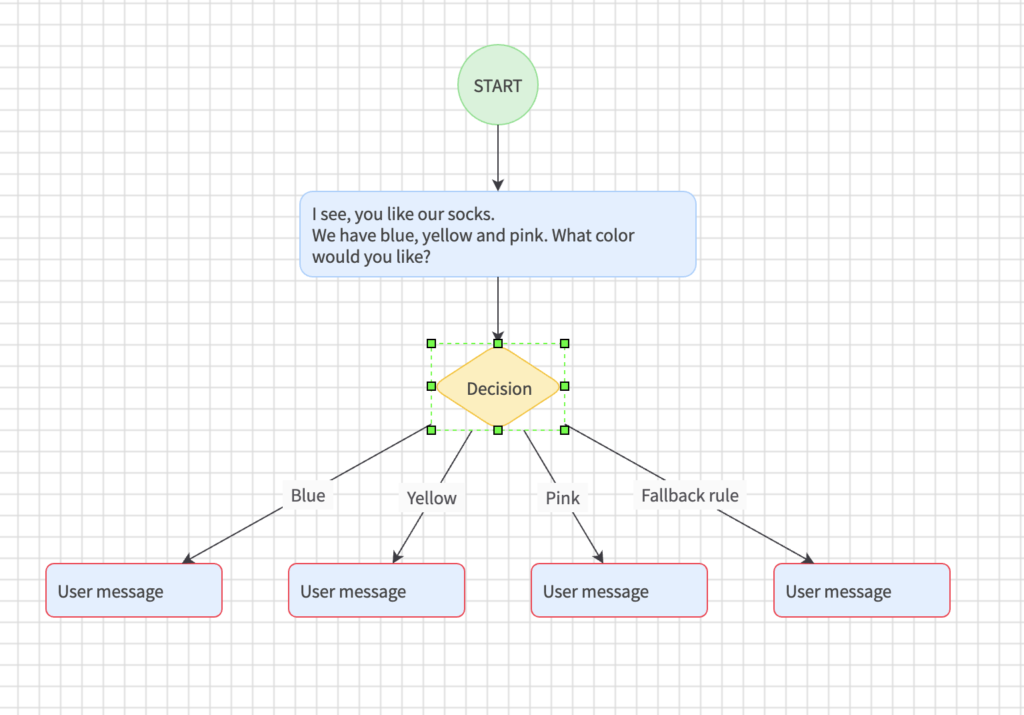
Multi-rule decision:
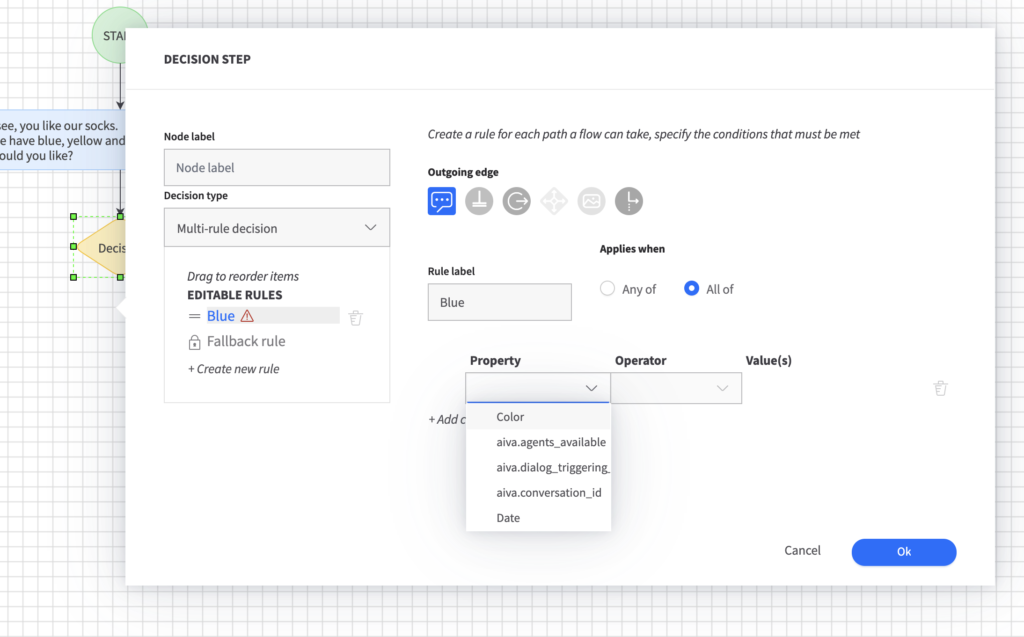
Node label: Give the node a label what the decision step is about. In our case:
Rule label: Type a name for each rule you add, and it will appear in the list of Editable rules.
Outgoing edge: What nodes that should be automatically pre-placed and linked. User message is pre-selected.
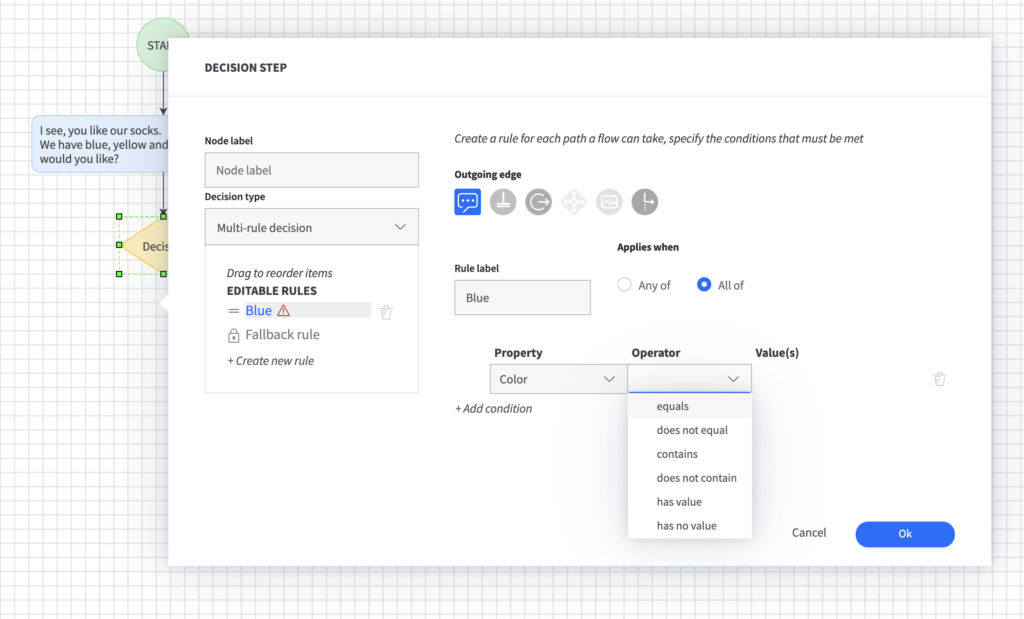
Property: Select the Property you have set in the former User massage node.
Operator: In this case , choose ”equals”.
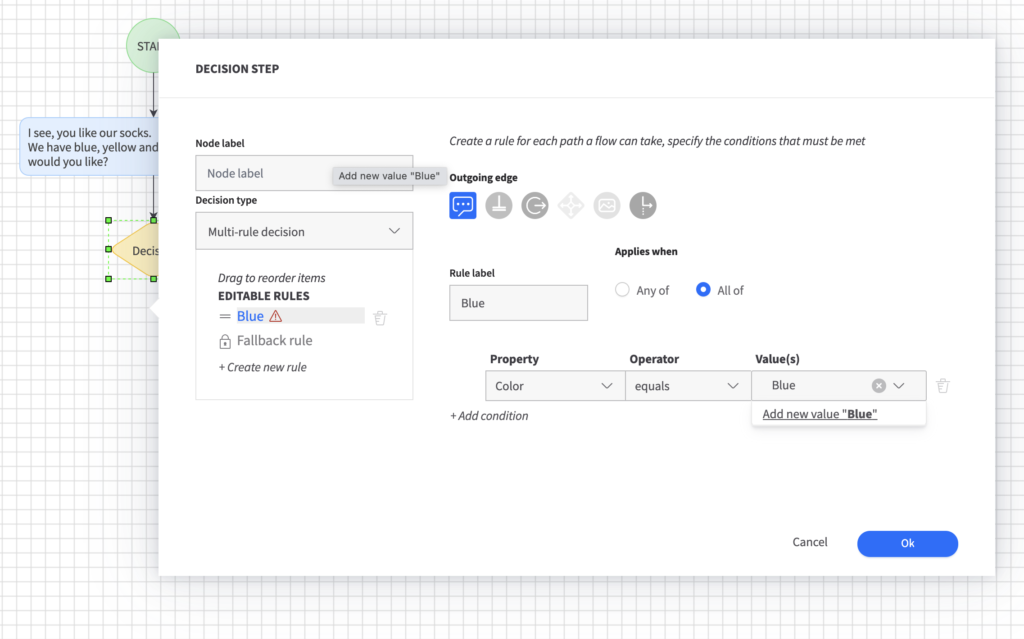
Vaue(s): Type the value. In this case ”Blue”. Click on the”Add new value ”Blue”, when it appears, to insert it.
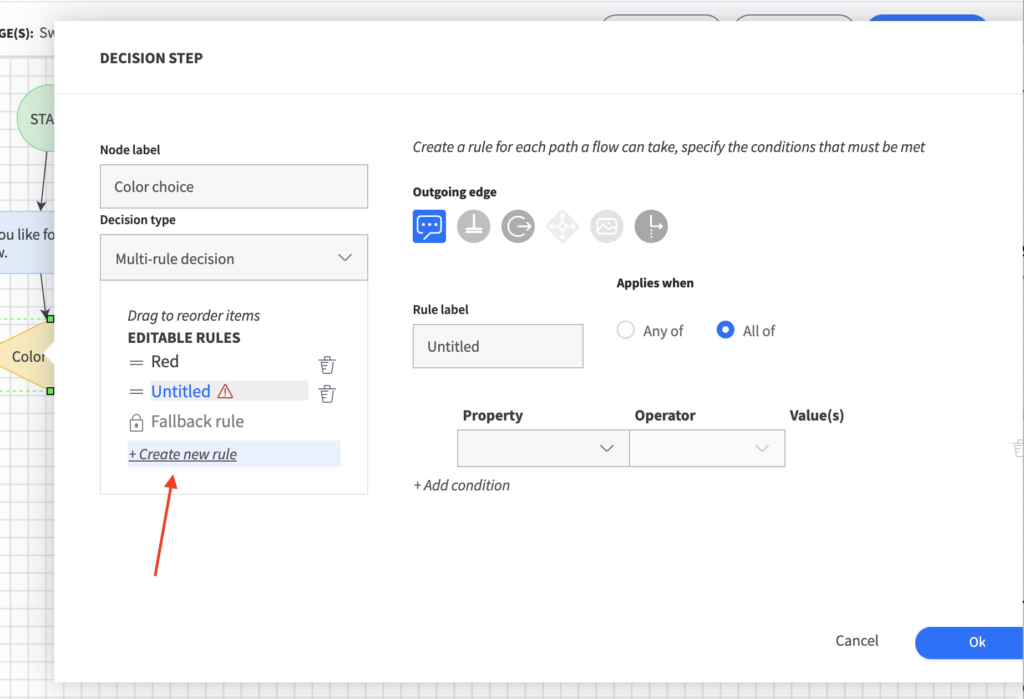
+ Create new rule: To add more options for the user to choose from, click ”+ Create new rule” and fill in the Property, Operator and give te new color a value, in this case ”Blue”
Fallback rule: If the user doesn’t type any of your set values, this is the road the dialog is going to take.
When you’re done creating desired number of rules, add the same number of User messages below it and attach them with an arrow from the Decision node. Add one for the Fallback rule.
Also set the right label for each User message node.
Random decision.
To present randomly presented User messages, select Random decision as Decision type. Connect as many User messages as you like and fill them with content.
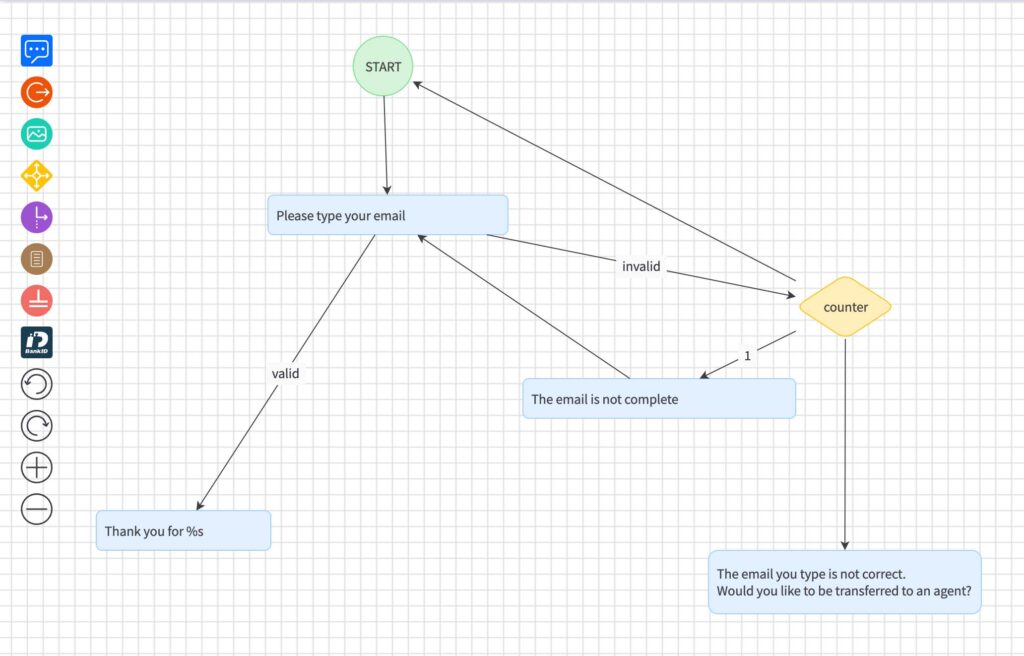
Counter decision.
To avoid a user continue looping indefinite if a dialog alternative or respons match, you can offer another path after a set number of loops.
For example: If a user do not enter the email in a correct format, you can ask user to re-type.
First arrow going TO the User message, type a ”1” on it and hit return. Drag an arrow going back to Counter decision node.
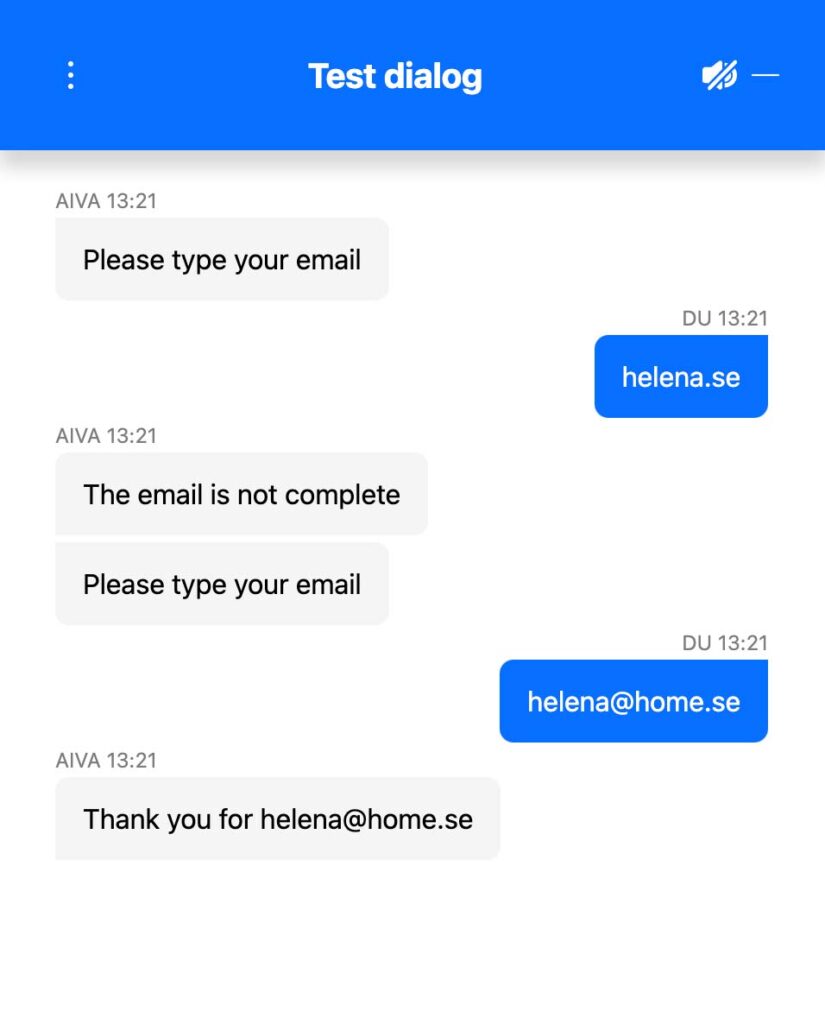
This is what the dialog would look like, if the user type correct the second time.
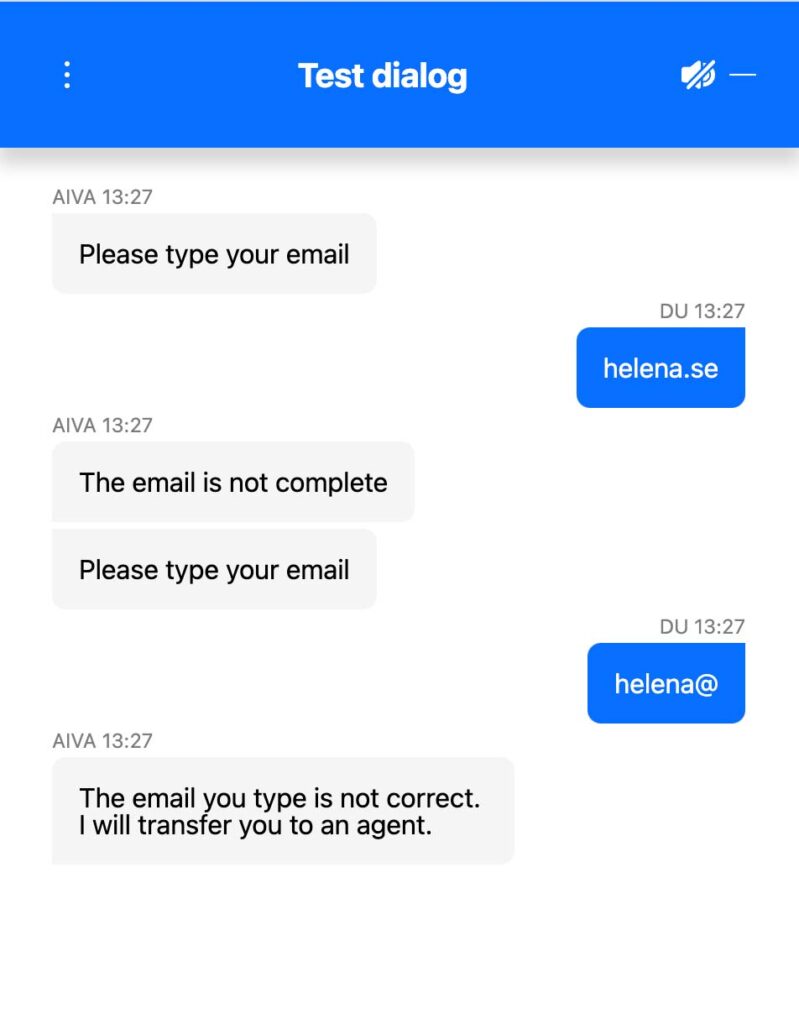
This is what the dialog would look like, if the user type wrong the second time.
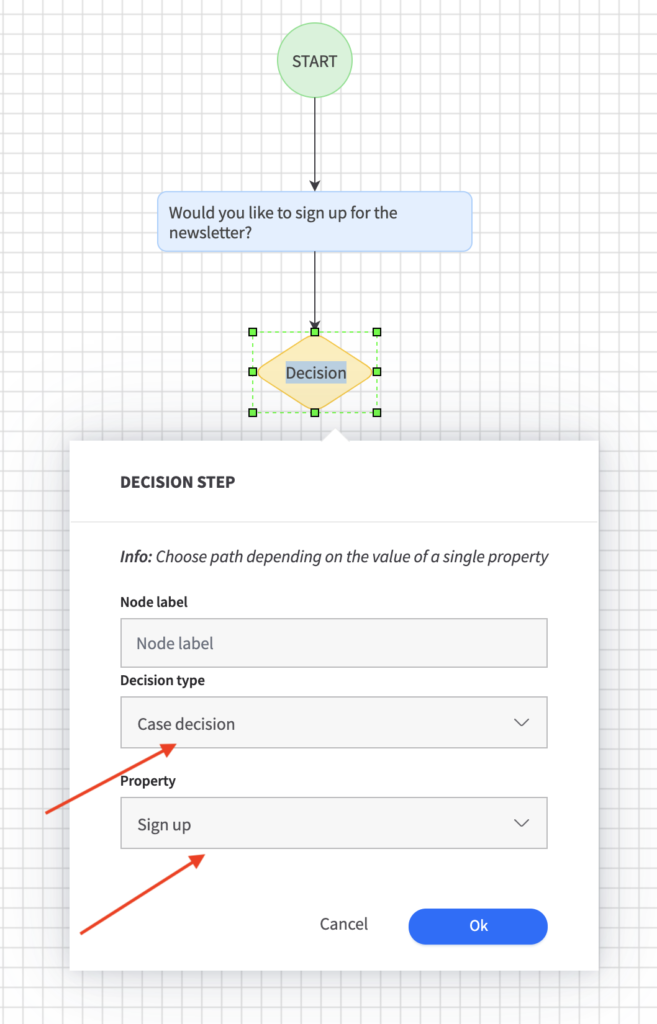
Case decision.
In the user message, set Property and type a name of it. In Alternatives you type ”Yes”, hit return and then ”No” and hit return.
Add a decision node and choose type: Case decision. Select the name of the Property you set in the former User Message node.
Also, give the Node label a name, here we wrote ”Sign up”.
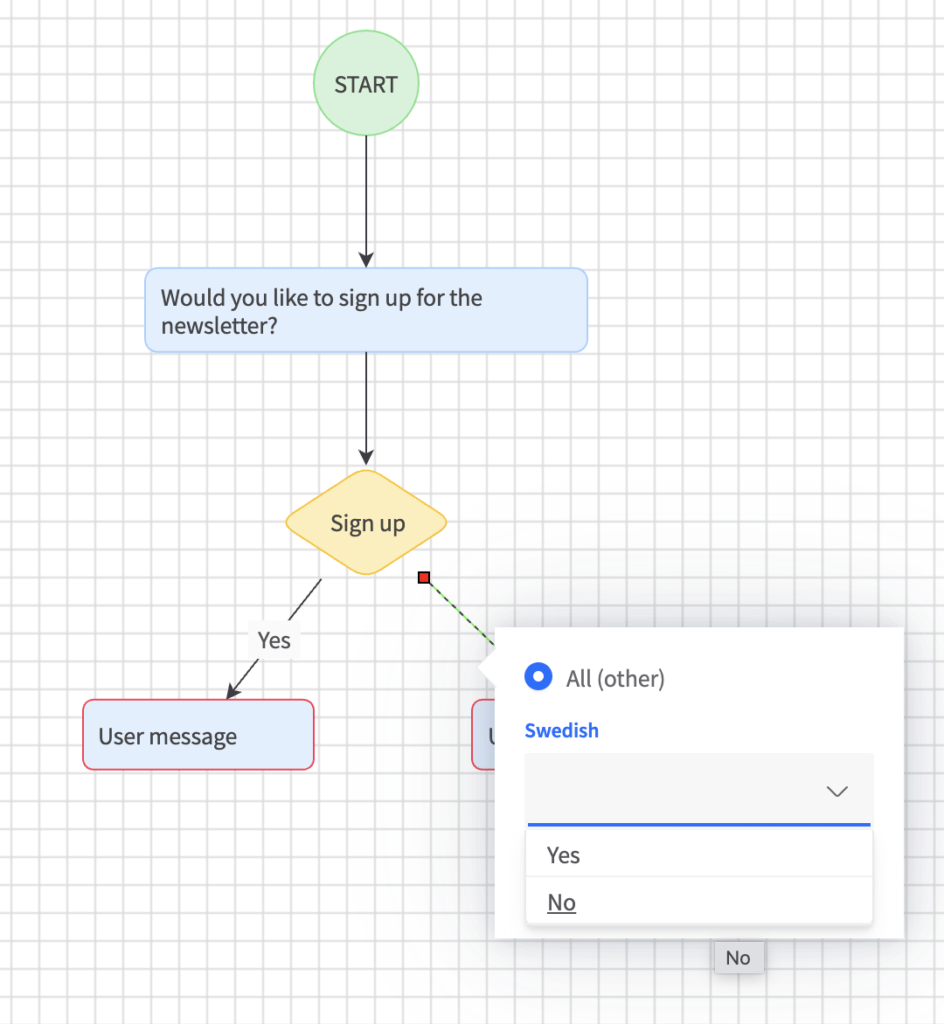
Add User message node, one for each alternative.
Connect them to the Decision node. Click on the arrow between the nodes and assign an Alternative from the dropdown.
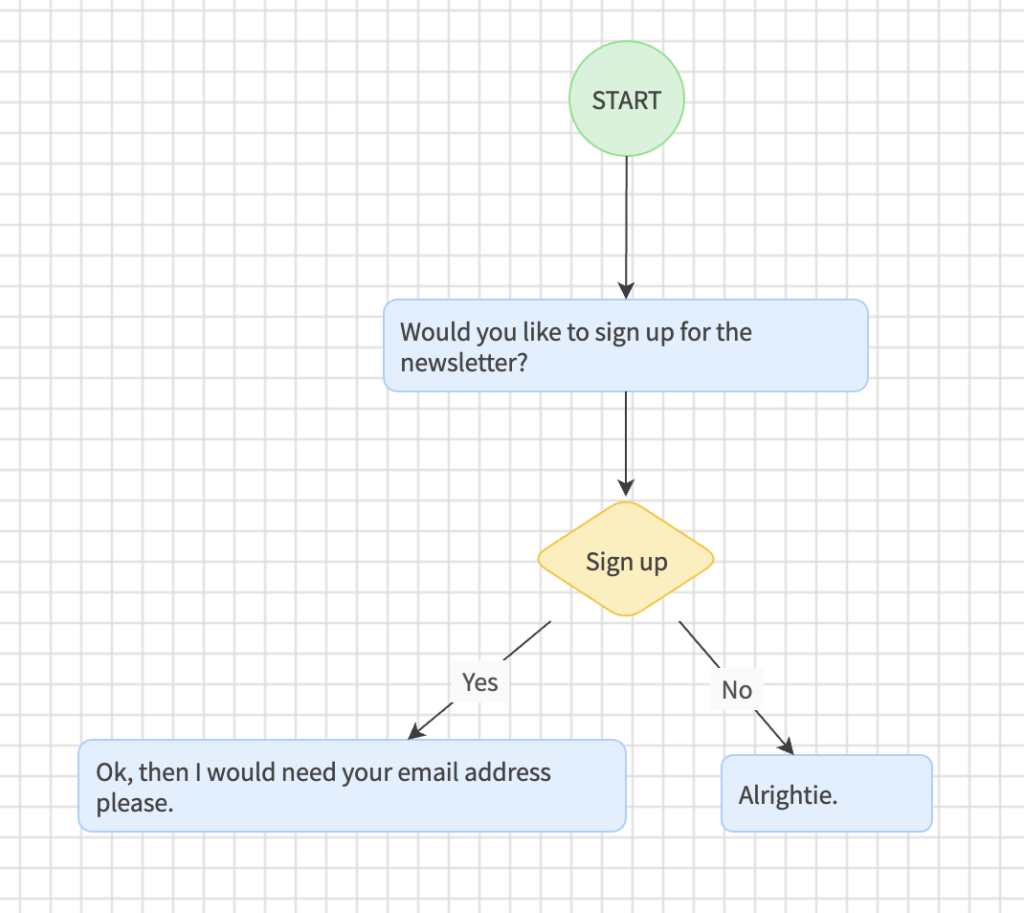
According to each Alternative, add appropriate text in each User message node.
Ready!
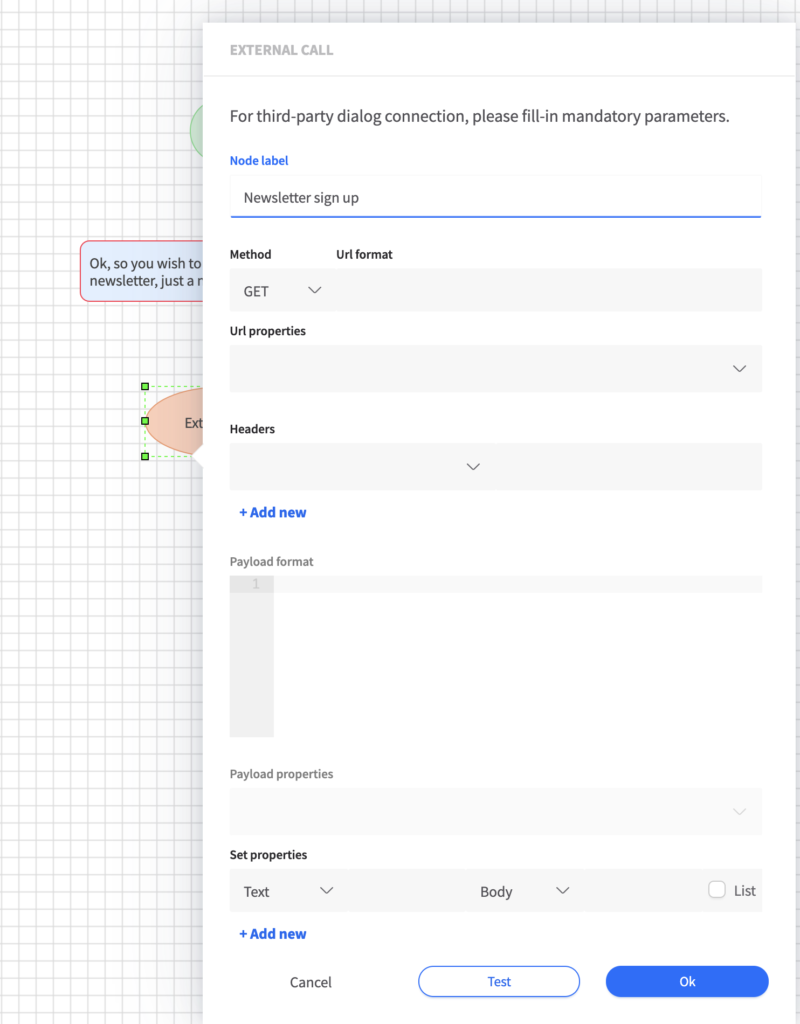
External call.
Usually we help our clients set upp this node, as it requires some know how in code. So, just give us a call or send an email.
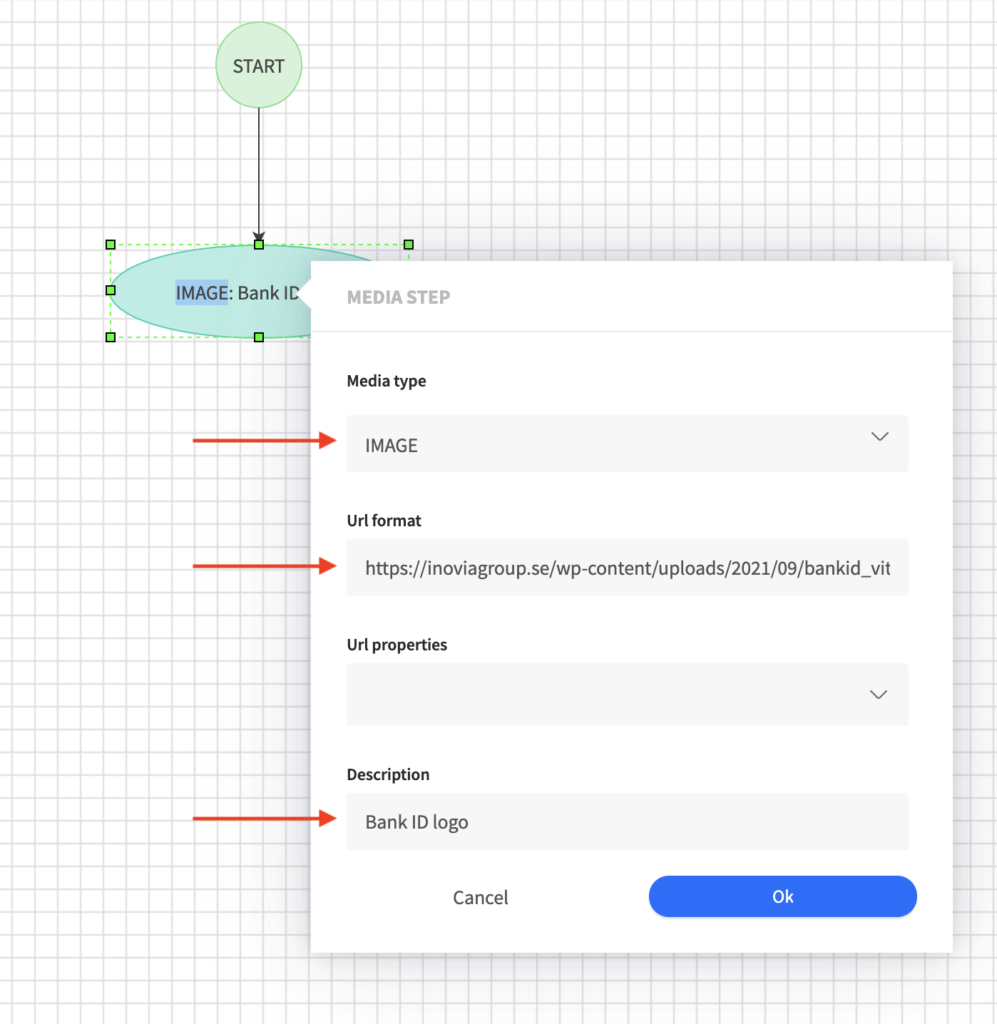
Media.
You can insert either an Image or a Link.
Url format: Insert the url of the image or link you’d like to show.
Url properties: To give known information back to the user – insert the property in the url. Choose appropriate property from the dropdown menu.
Description: If there is something wrong on the receivers side, give the image/link a name so the user know what the image is about.
Dialog redirect.
When you wish to re-use another existing flow, add the node Dialog redirect.
Choose the Dialog you want to connect with from the drop-down menu.
Knowledge.
A search function in webpages or uploaded documents.
In order to use the node Knowledge search, you first have to create the material in the app Knowledge.
Folder Select the folder where you have stored the uploaded file, url and keywords for this dialog.
Properties/Keywords
—
Include user query Include the users question as headline n search result.
Number of results to show in the chat Set the number of results you wish to present to the user.
End dialog
This step is normally used for hand -over to live agent. But there are other good ways to use it as well.
Ending method End dialog – Put in the end of every dialog to ensure triggering of courtesy dialog.
Label To be able to track user’s choice in Analytics, you can add a Label name. This will appear listed under that dialog.
This website uses cookies to ensure you get the best experience on our website.